DNA Lab
Purpose:
Materials:
analytical balance
tabletop milligram balance
weigh paper/weigh boats
lab scoops
sodium chloride
15mL capped tubes
tube rack (15mL tubes)
TRIS
EDTA, disodium salt
125mL bottle
100mL graduated cylinder
pH strips
hydrochloric acid
sodium hydroxide
glass stir rods
50mL beakers
salmon testes DNA
2mL pipet
pipet pump
P-1000 micropipet/ tips
95% ethanol
TAE buffer concentrate, 40x
600mL beaker
agarose
250mL media bottle
lab marker pens
microwave oven
hot hands protector
gel box, horizontal, for agarose gels
prepared agarose gel
reaction tubes/rack for 1.7mL
loading dye
micropipet/tips p-10 and p-100
microcentrifuge
ethidium bromide
gloves
Procedure:
Preparation of 5M of NaCl
1. Determine the mass of NaCl that needs to be measured.
2. Place NaCl in a 15mL conical tube. Add deionized water until a volume of 10mL is achieved.
3. Put mixture into a capped conical tube. Label.
Preparation of TE Buffer
1. Calculate the correct amount of TRIS to be measured.
2. Calculate the correct amount of EDTA to be measured.
3. Measure TRIS and EDTA. Place in 250mL beaker.
4. Add 80mL of deionized water.
5. Use pH paper to measure the pH
6. Adjust until the pH is in the range of 8.0.
7. Add deionized water until it reaches 100mL.
8. Pour into a 125mL capped bottle.
Spooling DNA
1. Prepare diluted salmon sperm DNA solution.
2. Add 500uL of 5M NaCl.
3. Run 4mL of ETOH along the side of the beaker. It should create a layer on top.
4. Using a glass rod wind the DNA onto the rod.
5. Get the ethanol off by touching it to a paper towel.
6. Put DNA into 2mL of TE buffer.
Making Agarose Gel
1. Prepare 1x TAE.
2. Measure out 0.4g of agarose, and place in a flask, along with the TAE.
3. Heat and swirl until the substance is clear.
4. Let the mixture cool until you are able to hold the flask for a few seconds.
5. Poor the mixture into the prepared gel mold.
6. Place the gel in a gel box.
7. Pour the 1x TAE over the gel so it is about halfway up the combs.
8. Pull the combs out of the gel.
Preparing the samples
1. In a 1.7mL tube mix the salmon sperm DNA and loading dye.
2. Place in a microcentrifuge for a couple seconds.
Loading the Samples
1. Load the DNA samples into the lanes.
Running the Samples
1. Connect the electrodes to the power supply.
2. Let run for about 45-60 minutes, or until the dye is about halfway down the gel.
3. Turn off power supply and place gel in a staining tray.
4. The teacher will stain the gel with EtBr, and rinse it off.(we let ours stain over night)
Conclusion
Isolating DNA from a solution is very valuable. It helps separate DNA and sort of purify it. Separating the DNA on a gel allows us to get a closer look and analyze the DNA more clearly. Separating DNA on gels is very beneficial to the forensics lab. Many times DNA needs to be analyzed in crimes, and it can be used as evidence. By using a gel Forensics scientists are able to compare different DNA samples according to how they show up on the gel.
Data Analysis
PART I
Unfortunately we were unable to see our DNA bands. When our teacher stained our gels, nothing showed up. We can predict that our DNA bands would have looked the same in all of the lanes of the gel. We can infer this because we were all using the same substance. We decided that we would need to hypothesize why our bands did not show up, so we made a list of ideas.
- DNA diffused- not likely because it was too big
- not loaded correctly- it is unlikely that everyone made the same mistake
- something wrong with the stain- it could have broken down since it is light sensitive
We decided that the most logical reason was the stain. Our teacher used an old batch from a previous year, so it could have broken down. We decided to make a new batch of stain.
a.) remade 1x solution from old 20,000x stock
b.) remade stock solution 20,000x and diluted it to 1x
We will stain 1 gel with each new solution for 3 hours, and then check it. Hopefully this will solve our problem, and will be able to see the bands of DNA.
PART II
In order to find a solution to our problem with seeing the DNA in the gels, we decided to make a new stock staining solution. Our teacher did this for us because the solution has dangerous substances in it. Our teacher re-stained the gels, and it worked! We were able to see the DNA. Because the new stain worked, we were able to conclude that the old stain that was used at first, was no longer useful. As we previously predicted, the DNA looked very similar in all of the lanes of the gel because they were all the same substances.
*There is a picture of our gel at the bottom of this page.
Reflection
For this lab we worked in a pretty big group. It was very surprising that we were able to work well together considering the number of people. I think that we did a nice job in dividing up the work evenly between all people. I really liked how we were all able to participate in loading the samples into the gel. I definitely think we could have been much more efficient. Sometimes we had more than one person weighing a substance when we probably only needed one. In times like this it would have been beneficial for the other people to be preparing any other substances that were needed. Our whole class did make one major mistake. When we stained our gels the DNA bands did not show up. In the data analysis I talked about an extra step that we are taking in order to find out what we did wrong. We will restain our gels with a new stain and see if the bands show up. However we did make other small mistakes. For example, We kept getting an air bubble in the pipet when we were filling it with one of the DNA samples that we wanted to load. It turns our we did not properly pipet the substances before. Therefore we did not have enough of the substance to fill the pipet to the desired amount. We fixed this problem by asking our teacher for help and remaking the sample with the DNA solution and loading dye. By analyzing this mistake, we learned that we still need more work on our pipetting, but I strongly believe that it has gotten better from the beginning of the year. Our group did a very good job with adjusting the pH of substances. We were able to get the substances to the desired pH easily. Of course we still need more practice with all of the skills required in this lab. There will always be room for improvement, and a need for practice. As many people already know, practice makes perfect.
- Make 10mL of 5M NaCl solution
- Make 100mL of TE buffer: 10mM Tris and 1mM EDTA
- Spool DNA
- Analyze the properties of the DNA
- Prepare an agarose gel for DNA fragment analysis
- Analyze the appearance of different DNA samples on an agarose gel
Materials:
analytical balance
tabletop milligram balance
weigh paper/weigh boats
lab scoops
sodium chloride
15mL capped tubes
tube rack (15mL tubes)
TRIS
EDTA, disodium salt
125mL bottle
100mL graduated cylinder
pH strips
hydrochloric acid
sodium hydroxide
glass stir rods
50mL beakers
salmon testes DNA
2mL pipet
pipet pump
P-1000 micropipet/ tips
95% ethanol
TAE buffer concentrate, 40x
600mL beaker
agarose
250mL media bottle
lab marker pens
microwave oven
hot hands protector
gel box, horizontal, for agarose gels
prepared agarose gel
reaction tubes/rack for 1.7mL
loading dye
micropipet/tips p-10 and p-100
microcentrifuge
ethidium bromide
gloves
Procedure:
Preparation of 5M of NaCl
1. Determine the mass of NaCl that needs to be measured.
2. Place NaCl in a 15mL conical tube. Add deionized water until a volume of 10mL is achieved.
3. Put mixture into a capped conical tube. Label.
Preparation of TE Buffer
1. Calculate the correct amount of TRIS to be measured.
2. Calculate the correct amount of EDTA to be measured.
3. Measure TRIS and EDTA. Place in 250mL beaker.
4. Add 80mL of deionized water.
5. Use pH paper to measure the pH
6. Adjust until the pH is in the range of 8.0.
7. Add deionized water until it reaches 100mL.
8. Pour into a 125mL capped bottle.
Spooling DNA
1. Prepare diluted salmon sperm DNA solution.
2. Add 500uL of 5M NaCl.
3. Run 4mL of ETOH along the side of the beaker. It should create a layer on top.
4. Using a glass rod wind the DNA onto the rod.
5. Get the ethanol off by touching it to a paper towel.
6. Put DNA into 2mL of TE buffer.
Making Agarose Gel
1. Prepare 1x TAE.
2. Measure out 0.4g of agarose, and place in a flask, along with the TAE.
3. Heat and swirl until the substance is clear.
4. Let the mixture cool until you are able to hold the flask for a few seconds.
5. Poor the mixture into the prepared gel mold.
6. Place the gel in a gel box.
7. Pour the 1x TAE over the gel so it is about halfway up the combs.
8. Pull the combs out of the gel.
Preparing the samples
1. In a 1.7mL tube mix the salmon sperm DNA and loading dye.
2. Place in a microcentrifuge for a couple seconds.
Loading the Samples
1. Load the DNA samples into the lanes.
Running the Samples
1. Connect the electrodes to the power supply.
2. Let run for about 45-60 minutes, or until the dye is about halfway down the gel.
3. Turn off power supply and place gel in a staining tray.
4. The teacher will stain the gel with EtBr, and rinse it off.(we let ours stain over night)
Conclusion
Isolating DNA from a solution is very valuable. It helps separate DNA and sort of purify it. Separating the DNA on a gel allows us to get a closer look and analyze the DNA more clearly. Separating DNA on gels is very beneficial to the forensics lab. Many times DNA needs to be analyzed in crimes, and it can be used as evidence. By using a gel Forensics scientists are able to compare different DNA samples according to how they show up on the gel.
Data Analysis
PART I
Unfortunately we were unable to see our DNA bands. When our teacher stained our gels, nothing showed up. We can predict that our DNA bands would have looked the same in all of the lanes of the gel. We can infer this because we were all using the same substance. We decided that we would need to hypothesize why our bands did not show up, so we made a list of ideas.
- DNA diffused- not likely because it was too big
- not loaded correctly- it is unlikely that everyone made the same mistake
- something wrong with the stain- it could have broken down since it is light sensitive
We decided that the most logical reason was the stain. Our teacher used an old batch from a previous year, so it could have broken down. We decided to make a new batch of stain.
a.) remade 1x solution from old 20,000x stock
b.) remade stock solution 20,000x and diluted it to 1x
We will stain 1 gel with each new solution for 3 hours, and then check it. Hopefully this will solve our problem, and will be able to see the bands of DNA.
PART II
In order to find a solution to our problem with seeing the DNA in the gels, we decided to make a new stock staining solution. Our teacher did this for us because the solution has dangerous substances in it. Our teacher re-stained the gels, and it worked! We were able to see the DNA. Because the new stain worked, we were able to conclude that the old stain that was used at first, was no longer useful. As we previously predicted, the DNA looked very similar in all of the lanes of the gel because they were all the same substances.
*There is a picture of our gel at the bottom of this page.
Reflection
For this lab we worked in a pretty big group. It was very surprising that we were able to work well together considering the number of people. I think that we did a nice job in dividing up the work evenly between all people. I really liked how we were all able to participate in loading the samples into the gel. I definitely think we could have been much more efficient. Sometimes we had more than one person weighing a substance when we probably only needed one. In times like this it would have been beneficial for the other people to be preparing any other substances that were needed. Our whole class did make one major mistake. When we stained our gels the DNA bands did not show up. In the data analysis I talked about an extra step that we are taking in order to find out what we did wrong. We will restain our gels with a new stain and see if the bands show up. However we did make other small mistakes. For example, We kept getting an air bubble in the pipet when we were filling it with one of the DNA samples that we wanted to load. It turns our we did not properly pipet the substances before. Therefore we did not have enough of the substance to fill the pipet to the desired amount. We fixed this problem by asking our teacher for help and remaking the sample with the DNA solution and loading dye. By analyzing this mistake, we learned that we still need more work on our pipetting, but I strongly believe that it has gotten better from the beginning of the year. Our group did a very good job with adjusting the pH of substances. We were able to get the substances to the desired pH easily. Of course we still need more practice with all of the skills required in this lab. There will always be room for improvement, and a need for practice. As many people already know, practice makes perfect.
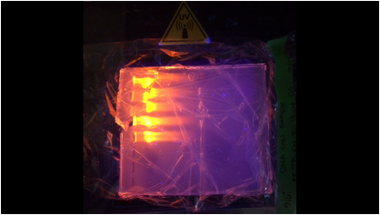
Our gel after it was re-stained.
